Di PT kita saya memiliki nama Sakura Kinomoto sebagai administrasi support, Berikut mengenai diri saya:
Sabtu, 03 Agustus 2013
PT Kita
PT Kita merupakan sebuah perusahaan distributor
yang menjual Perangkat Komputer. Dalam struktur organisasinya dikepalai oleh
Mr. Sifu dan ada beberapa bagian didalamnya. Diantaranya departemen Purchasing,
Marketing, HRD, Accounting and Finance, IT. Disini saya berada dalam departemen
marketing, dan berikut struktur organisasi di departemen Marketing :

JOB DESCRIPTION
Manager
(Piccolo)
·
Merencanakan, mengontrol dan
mengkoordinir proses penjualan dan pemasaran bersama Head Section.
·
Berkordinasi kepada Head Section
untuk mencapai target penjualan dan mengembangkan pasar secara efektif dan
efisien.
·
Menerapkan budaya, sistem, dan
peraturan intern perusahaan serta menerapkan manajemen biaya, untuk memastikan
budaya perusahaan dan sistem serta peraturan dijalankan dengan optimal.
·
Menganalisa dan memberikan arah
pengembangan penjualan, untuk memastikan pengembangan produk sesuai dengan
kebutuhan pasar.
2Sales
and Promotion Section Head
·
Menentukan harga jual produk yang
akan dilaunching.
·
Membuat jadwal kunjungan serta sistem
promosi untuk memastikan tercapainya target penjualan.
·
Menganalisa dan mengembangkan
strategi marketing untuk meningkatkan jumlah pelanggan dan area sesuai dg
target yang ditentukan.
·
Melaporkan aktivitas penjualan
perusahaan kepada Manager.
3 Distribution
Relations Section Head
·
Melakukan evaluasi kepuasan pelanggan
dari hasil survey seluruh sales team.
·
Memastikan tercapainya target
kepuasan pelanggan yang ditentukan.
·
Menganalisa data keuangan klien
dengan tujuan penaksiran investasi klien.
·
Memastikan pendekatan layanan
pelanggan berorientasi diadopsi setiap saat dan memastikan risiko telah dinilai
dan dikendalikan.
·
Melaporkan aktivitas evaluasi
pelayanan kepada Manager.
Warehouse
and Market Logistics
·
Memonitor perolehan order serta
merangkumkan forecast untuk memastikan kapasitas produksi terisi secara
optimal.
·
Memonitor jumlah stock seluruh Dept.
Sales & Marketing untuk memastikan umur stock perusahaan tidak melebihi
target yang telah ditentukan.
Salesperson
for Institutional Customers
·
Berkewajiban untuk dapat menjalin
hubungan baik dengan pelanggan lama maupun baru dari institusional serta
melakukan maintenance terhadap pelanggan perusahaan tersebut.
·
Menyiapkan prospek klien baru di
bidang institusional.
·
Menjual produk teknologi perusahaan, maksudnya
menawarkan produk-produk baru kepada setiap pelanggan tetap sebelumnya atau
calon pelanggan perusahaan.
Salesperson
for Wholesale Customers
·
Berkewajiban untuk dapat menjalin
hubungan baik dengan pelanggan lama maupun baru yang membeli dengan volume
banyak serta melakukan maintenance terhadap pelanggan tersebut.
·
Menyiapkan prospek klien baru dalam
pembelian jumlah banyak.
·
Menjual produk teknologi perusahaan, maksudnya
menawarkan produk-produk baru kepada setiap pelanggan tetap sebelumnya atau
calon pelanggan perusahaan
Relations Customer Service
·
Sebagai Komunikator, artinya sebagai
orang yang menghubungi customer dan memberikan informasi tentang segala sesuatu
yang ada hubungannya antara perusahaan dengan customer.
·
Menjalin komunikasi yang baik dengan
pelanggan.
·
Memiliki keterampilan secara kuantitatif
yang baik.
·
Mempertahankan pelanggan yang telah
ada.
8
Administrassion
Support
·
Bertanggung jawab melakukan support
atas segala kebutuhan marketing.
·
Membuat Quotations dan mengirimkan kepada
customer dan melakukan Follow Up kepada customer.
·
Mengelola segala kebutuhan promosi
dan komunikasi, baik hard maupun softcopy.
·
Membuat materi keperluan sales and
marketing, misalnya : dalam membuat brosur, promosi, quotation, email blast,
korespondensi dengan customer
·
Melakukan support dalam administrasi
tender bila diperlukan.
·
Melakukan pengklasifikasian dan
menjaga data-data
·
Memasukkan data-data ke system serta
membuat laporan dan notulen.
Jumat, 02 Agustus 2013
Business Process ADempiere
Module Objectives
·
Overall ADempiere
·
Go through sale cycle
–Sale module
–Finance module
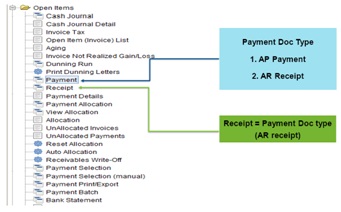
(Receipt)
·
Go through purchase cycle
–Purchase module
–Finance module
(Payment)
·
Hands on
Modules in Adempeire

Sales Cycle (Trading)

Sales Cycle –Quote to Invoice

Sales Order

Shipment (Delivery)


Ways to Create document

Sales Invoice


Sales Invoice and Billing

Receipt payment from Customer

Receipt payment from Customer (Partial)

Purchase Cycle

Purchase Cycle -Requisition to Invoice

Payment to Vendor

Payment vsReceipt
Create Purchase Requisition (PR)

Create Purchase Order (PO)

Print Preview Purchase Order

Material Receipt

Invoice (Vendor)


Summary of Material Receipt and Invoice (Vendor)
accounting facts

Outstanding Liabilities

Purchase Cycle –Requisition to Invoice

View Unpaid Invoices

Creating Payment Proposal

Payment Print/Export

View Payment Allocation

Summary of Payment accounting facts

Bank Statement

Summary of Payment accounting facts

Rabu, 31 Juli 2013
Installasi Adempiere ERP
Untuk menjalankan ADempiere ERP ada
beberapa software yang harus kita install terlebih dahulu, antara lain :
1.
JDK
–ADempiereneed JDK not JRE
–We are using JDK6 update 20, but any
update is fine
–http://www.oracle.com/technetwork/java/javase/downloads/index.html

2.
PostgreSQLDatabase
–We are using version 8.4, but any
version is fine
–http://www.enterprisedb.com/products-services-training/pgdownload#windows

3.
ADempiere
–Current version is 3.6.0LTS
–https://sourceforge.net/projects/adempiere/files/ADempiere%20Official%20Release/

4.
ADempierePatches &
Migration Scripts
–Use same patch version as
ADempiere’sversion
–https://sourceforge.net/projects/adempiere/files/ADempiere%20Patches/
Installation Steps Overview

Install Java JDK
·
Install
the JAVA JDK (i.e., jdk-6u20-windows-i586.exe) with the default installation
settings. Say OK to install the follow-on JRE as well.
·
Open
Windows Explorer and navigate to the C:\Program Files\Java directory (or
where-ever your Java is installed) and carefully note the full path for the JDK
directory (e.g: C:\Program Files\java\jdk1.6.0_20) and the JRE directory that
you have just installed
Set JAVA Environment Variable
· On
your Desktop (or using Start button / My Computer) right click My Computer and
select System Properties / Advanced / Environmental Variables. (Alternatively:Start→ControlPanel→System→Advancedtab.)
· Add a new System Variable JAVA_HOMEfor
your new JDK directory:

·
JAVA_HOMEuseC:\Program Files\Java\jdk1.6.0_20(or
whatever your JDK directory is called)Back in My Computer / System
Properties / Advanced / Environmental Variables, find thePathvariable
and click Edit.
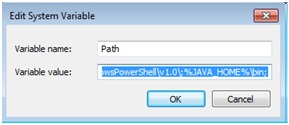
·
Append
the following JDK path (%JAVA_HOME%\bin) to the end of Path variable after
putting in a connector semi-colon ";“

Install PostgreSQLDatabase
Install
PostgreSQLby running the Windows executable installer (i.e.,
postgresql-8.4.4-1-windows.exe)
·
Select your Locale and make sure the
"pl/pgsql" box is ticked (which is the default)
·
Uncheck the box "Launch Stack
Builder at exit" and Finish. Cancel out of Stack Builder if it insists in
launching

Note : If you receive an error message
that the port is already in use, you probably have an old Postgresservice running.
Go to Control Panel/Administrative Tools/Services, find PostgresDatabase
Server, Stop the service and set its startup to Manual. Try again.
Set System Variable for PostgreSQLDatabase
·
Create an environment variable POSTGRES_HOMEset
to the PostgreSQLinstall directory, for example "C:\Program
Files\PostgreSQL\8.4"
·
Edit the PATH variable again and add%POSTGRES_HOME%\bin
to the end of the path. This will make it easy to run the psqlcommand from
any directory.
·
In a DOS shell, type PATH and carefully
check the result to ensure the JAVA and Postgrespaths are correctly added to
the PATH.
·
Start the PostgreSQLservice. There
will be a menu item in the PostgreSQLStart Menu to start the PostgreSQLservice.
It may already be running following the install. Check the running Services
(Control Panel/Administrative Tools/Services).
Install Adempiere
There is no install script. Just extract the Adempierezip
file to <drive letter>:\(e.g. c:\)

Note: You should end up with the files in a
folder like C:\Adempiere. Do not extract to C:\Program Files\Adempiere.
The batch scripts do not like the long file names with spaces. Also make sure
you haven't created a chained directory like C:\Adempiere\Adempiere.
Apply Patches (Optional)
This
step is required only if there are patches to apply
·
Download latest patch file (i.e.,
20101111_patches_360_14470.jar)
·
Rename this file to “patches.jar”
· Navigate to C:\Adempeire\lib and
replace with the new patches.jar file (backup the old file by rename it to
patches.jar.old)

Initial ADempiereVariable Setup
A setup utility in
ADempierewill prepare the software for use and create environment variables
needed in the following steps.
·
Navigate to C:\Adempiere and
execute RUN_setup.bat. If this is the first time you are running this, a
license and security keys dialogs will appear. Accept the defaults.
·
The setup dialog will appear, you
may need to change the followings,
–Database
Server from <your-computer-name> to localhost
–Database
Type from oracleXEto postgresql
–Database
Name from xeto adempiere
–System
Password to postgres(or whatever you entered above for the database
administrator)
–Database
Password to adempiere
–Don't change
anything in the Mail Server settings unless you want to set-up Adempierefor
production purposes
You
may also need to change the following:
–AdempiereHome to C:\Adempiere (if
somehow it has been set to the wrong location)
–Application Server Web Port to 8080
(if 80 is being used by something else) and SSL to 8443 (instead of 443)
Initial ADempiereVariable Setup
Press the Test
button. When the Test completes without errors and the
Save button (bottom, right) is activated, click the Save button. Wait a
few minutes until the AdempiereServer Setup screen disappears and the
deployment is finished.
This
step will take times!
·
The database does not have a
user adempiereor a database adempiereat this point, so these
tests will not be checked. The user and database will be created in the next
step.
· Every time the new patches.jar
is deployed, we will need to re-execute RUN_setup.bat or if no variable
is changed,RUN_silentsetup.bat

Create Database “adempiere”
Navigate to
C:\Adempiere\utils
·
Run the scriptRUN_ImportAdempiere.bat
·
You will see information about
adempiere.dmp file (such as date creation, size, etc.) and the message:== The import will show warnings. This is Ok
==
·
The script willDROPany existing adempieredatabase. Do
not run this command if you already have data loaded.

Apply Migration Script (Optional)
This
step is required only if there are migration script to apply
·
Download latest migration script
(i.e., 20101101_migra_360.zip)
·
Expand it, you will see *.sql files
under postgresqlfolder. You can actually run it one by one in the
command line
psql-f<number>.sqladempiereadempiere
OR
run multiple files at once by
·
Setup a '.pgpass'file
according to the instructions for your version of PostgreSQL(for 8.4, see30.14. The Password File). This will
prevent the password entry each time you run the psqlcommand.
·
From a DOS shell, navigate to the
directory where the scripts are located and execute this command:
FOR%N
IN (*.sql) DO psql-f%N adempiereadempiere
Start Application Server
·
Open a DOS shell Navigate to
C:\Adempiere\utils Type 'RUN_Server2.bat'and wait for the server to
fully start -it will end this phase with "INFO [Server] JBoss.... Started
in xx:xx:xxms", which will take around 2 to 3 minutes.
CONGRATULATIONS!!!
The server is up and running, we
shall now launch the Application
·
Leave this DOS shell running.
Later, to shut down the Application Server, you can either RUN_Server2Stop in
another DOS Shell or simply close the shell.
·
If you would like to run the
server as a service, in a DOS shell, navigate to C:\Adempiere\utils\windows and
run Adempiere_Service_Install.bat. You will need to open the Services Window (Control
Panel→AdministrativeTools→Services)
to set the properties so the service starts automatically or manually.
Install Client Application
·
Go to URL
http://<server>/admin
·
Click
on button Web Start to download and install client application

(Behind the Scene of Client Install)
1.
adempiereDirect.jnlpdownloaded from
server
2.
Executed by javaws.exe to create
client application
3.
Necessary components and
Adempiere.properties downloaded and installed on client machine
4.
Application executed on client, note
that the connection is also passed here
5.
Shortcut is point to the server to
always INSYNCwith latest version on server

2 Ways to launch Adempeire
1.
Through Client Application
–Double click on Adempeireicon

2.
Through Web Browser (application
server must be running)
–Open browser
and go to URL http://<server>/webui

Adempiere.properties
Adempiere.propertiesis
where the connection information is being stored
·
With Client App,
it will look at C:\Users\<name>\Adempiere.properties, which was
downloaded from server during client installation
·
With Web App,
Web Server will look at server C:\Adempiere\Adempiere.properties

Berikut Video tutorial mengenai installasi ademipere :
Langganan:
Postingan (Atom)